Setup for iOS AppStore
This guide details the necessary steps to configure your development environment, Apple Developer account, and App Store Connect settings before implementing In-App Purchases for iOS or macOS using cordova-plugin-purchase v13+.
Platform Interfaces Change Frequently!
The App Store Connect interface and Apple's requirements (like agreements) can change. This guide provides a general overview based on common practices but may become outdated.
Always refer to the official Apple documentation as the primary source:
- App Store Connect Help
- In-App Purchase Configuration
- Setting Up StoreKit Testing in Xcode (Recommended for local testing)
- Generating Keys (Shared Secret) (Needed for Receipt Validation)
1. Install Dependencies
Ensure you have the basic development tools installed (Node.js, Cordova CLI, Xcode).
Needless to say, make sure you have the tools installed on your machine. During the writing of this guide, I've been using the following environment:
- NodeJS v10.12.0
- Cordova v8.1.2
- macOS 10.14.1
I'm not saying it won't work with different version. If you start fresh, it might be a good idea to use an up-to-date environment.
2. Create or Prepare Cordova Project
Set up your Cordova project and add the iOS platform.
Create the project
If it isn't already created:
$ cordova create CordovaProject cc.fovea.purchase.demo PurchaseNC
Creating a new cordova project.
For details about what those parameters are:
$ cordova help create
Note, feel free to pick a different project ID and name. Remember whatever values you put in here.
Let's head into our cordova project's directory (should match whatever we used in the previous step.
$ cd CordovaProject
Add iOS platform
$ cordova platform add ios
- Important: Ensure the
<widget id="...">in yourconfig.xmlmatches the Bundle ID you will use in App Store Connect.
3. Setup AppStore Connect Application & Agreements
Configure your app record and ensure all necessary legal agreements are active.
- Apple Developer Account: You need an active Apple Developer Program membership.
- App Record: Create an App Record for your application in App Store Connect if you haven't already. Use the same Bundle ID as in your
config.xml. - Agreements, Tax, and Banking: This is critical.
- Go to the "Agreements, Tax, and Banking" section in App Store Connect.
- Review and accept all required agreements, especially the "Paid Apps" agreement.
- Ensure their status is Active.
- Provide complete banking and tax information as requested.
- Failure to complete this step will prevent all In-App Purchases (including sandbox tests) from working.
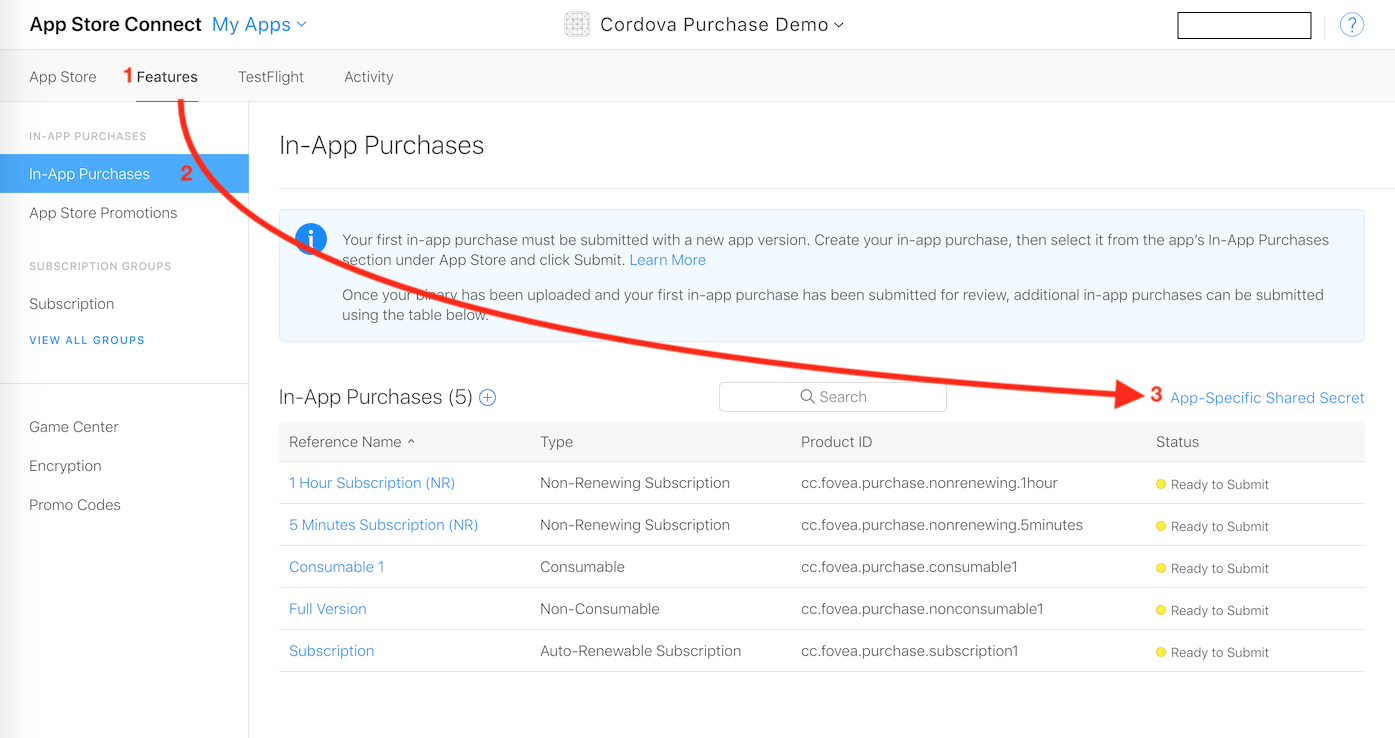
- App-Specific Shared Secret: You will need this secret for server-side receipt validation.
- Go to your App Record in App Store Connect.
- Navigate to "App Information" -> "App-Specific Shared Secret" (or similar path).
- Generate or view the secret.
- Copy and securely store this secret. It will be needed for your validation server (e.g., in your Iaptic settings or custom backend).
First, I assume you have an Apple developer account. If not time to register, because it's mandatory.
Let's now head to the AppStore Connect website. In order to start developing and testing In-App Purchases, you need all contracts in place as well as your financial information setup. Make sure there are no warning left there.
I'll not guide you through the whole procedure, just create setup your Apple application as usual.
Retrieve the Shared Secret
Since you are here, let's retrieve the Shared Secret. You can use an App-Specific one or a Master Shared Secret, at your convenience: both will work. Keep the value around, it'll be required, especially if you are implementing subscriptions.
4. Install Plugin and Configure Xcode Project
Install the purchase plugin and enable the necessary capability in Xcode.
- Install Plugin:
cordova plugin add cordova-plugin-purchase - Prepare iOS Platform:
cordova prepare ios - Configure Xcode:
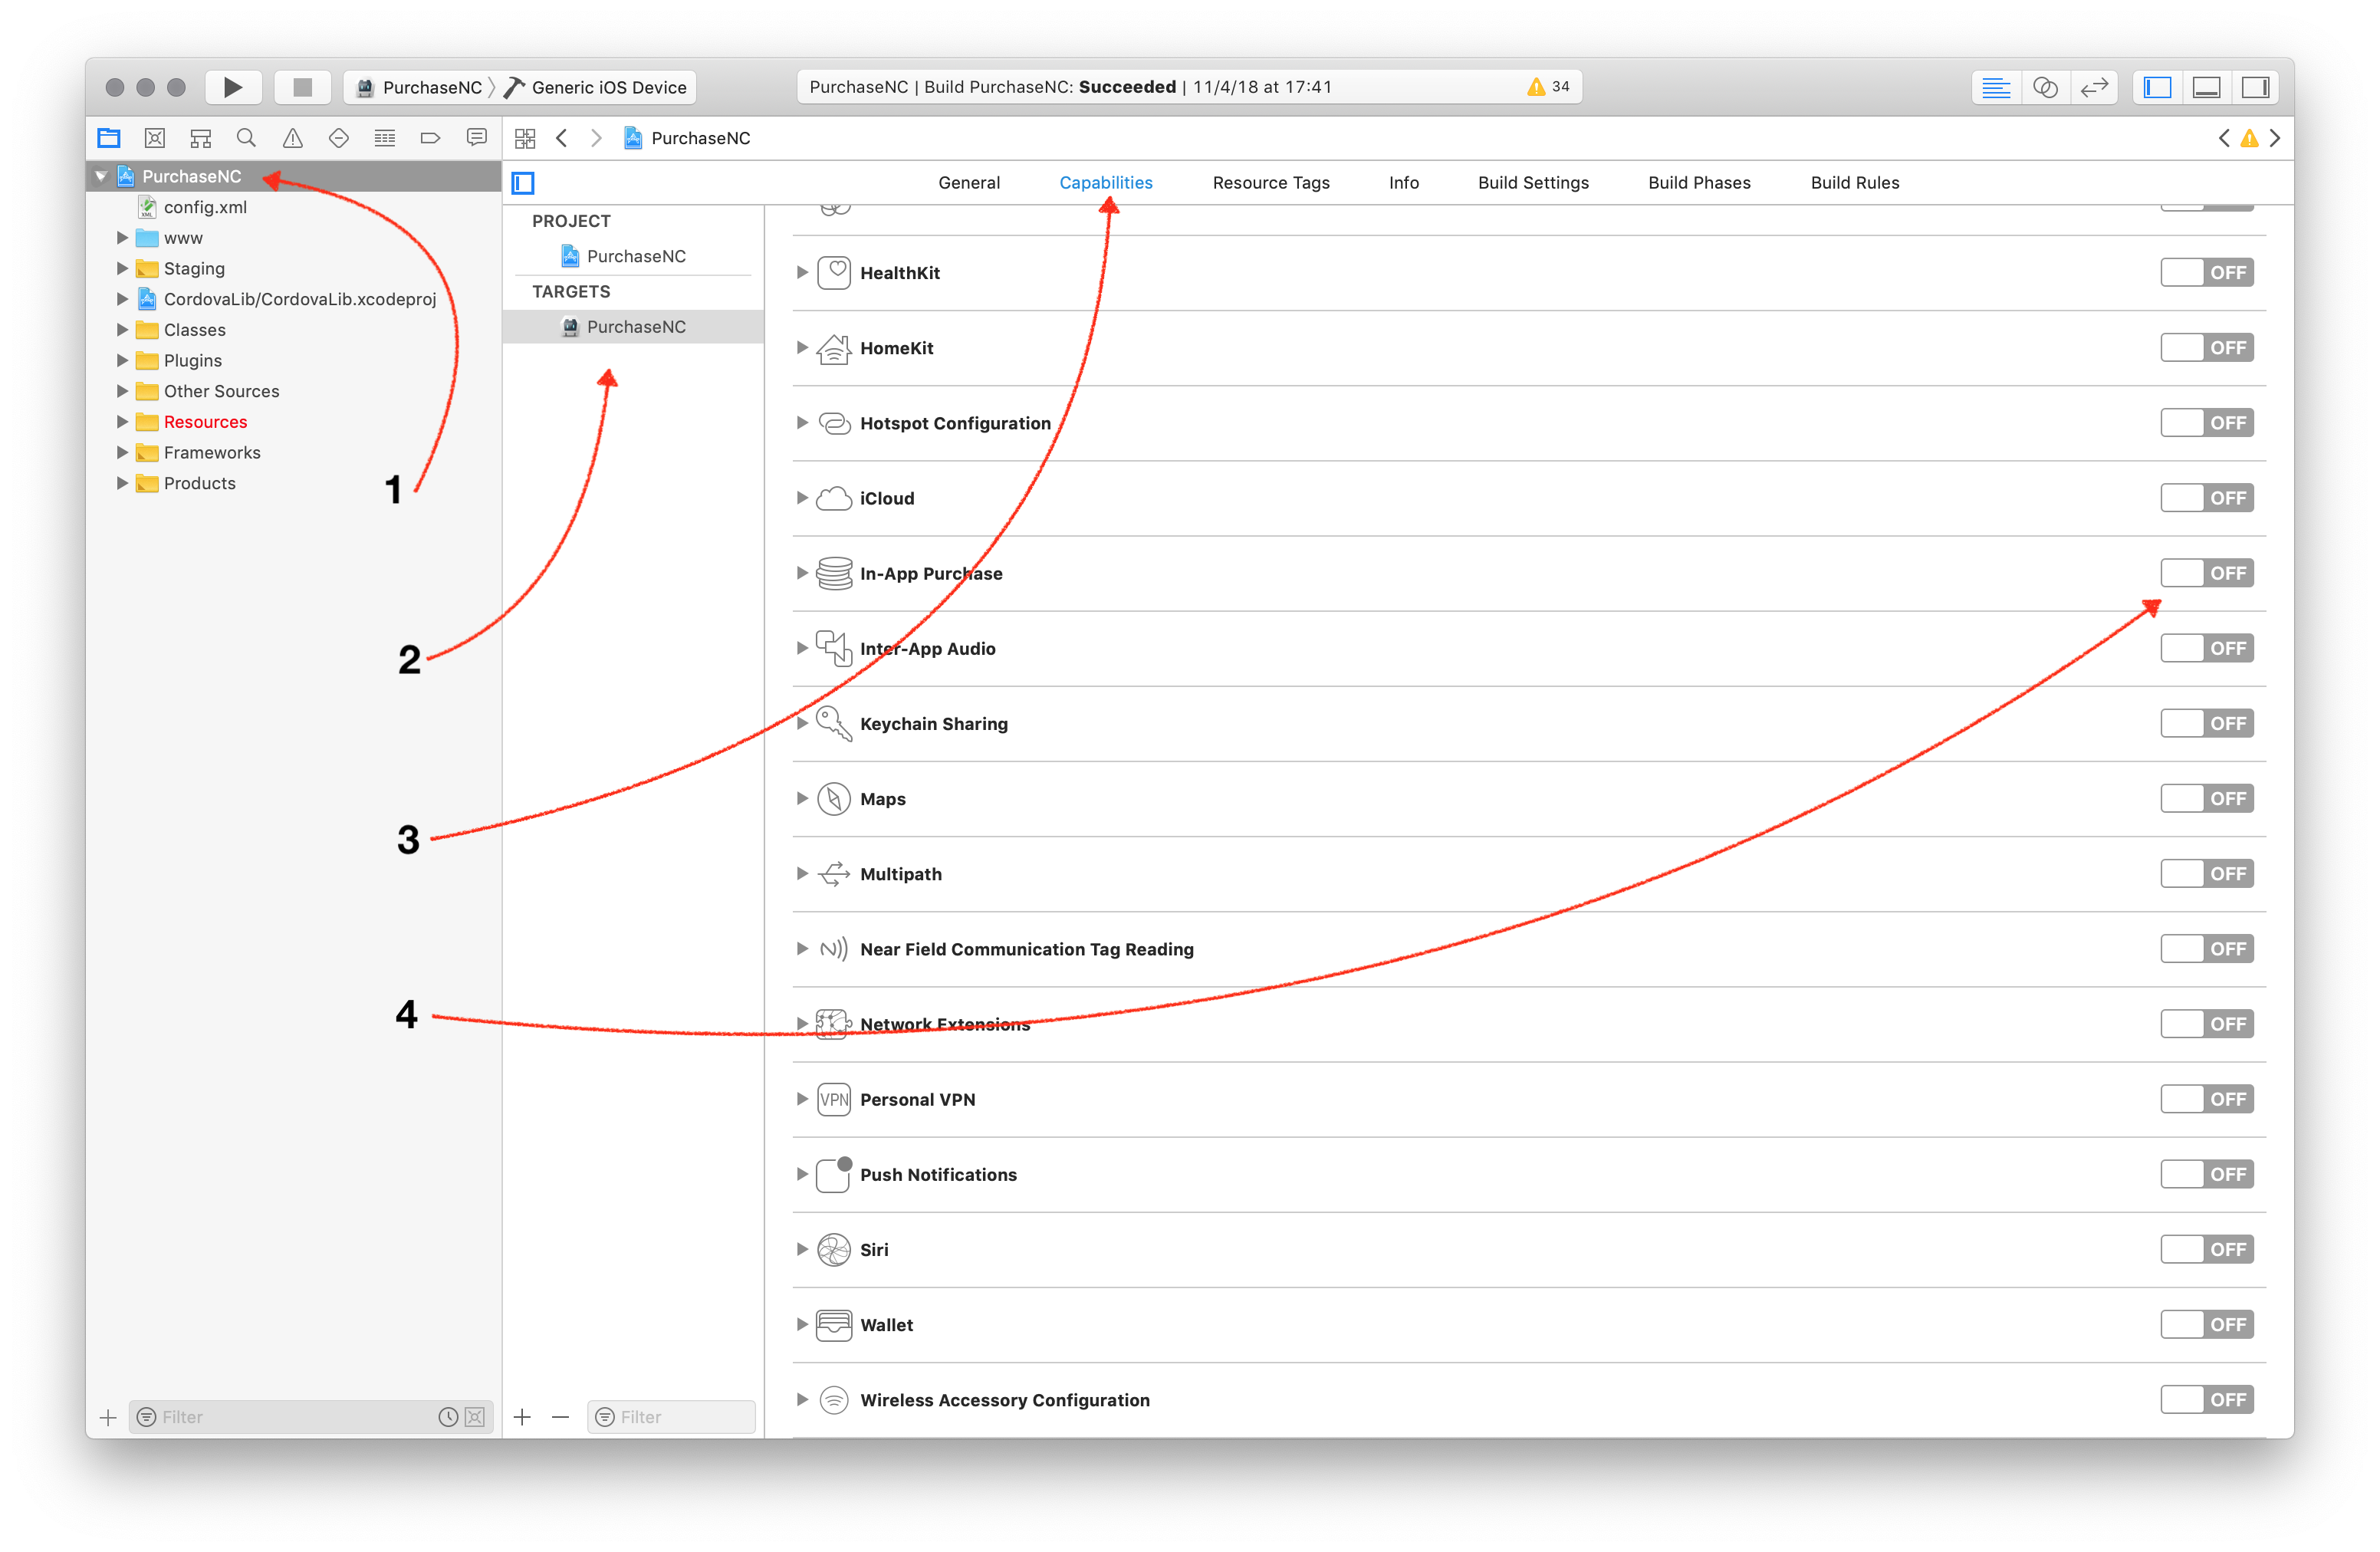
- Open your project's
.xcworkspace(or.xcodeproj) file located inplatforms/ios/. - Select your project target in the Project Navigator (left sidebar).
- Go to the "Signing & Capabilities" tab.
- Ensure a valid "Team" is selected and signing is configured.
- Click "+ Capability".
- Search for and add "In-App Purchase". Verify it appears in the list.
- Open your project's
5. Create In-App Products
If you followed the Setup AppStore Application section, you should have everything setup. Head again to the App's In-App Purchases page: select your application, then Features, then In-App Purchases.
From there you can create your In-App Products. Select the appropriate type, fill in all required metadata and select cleared for sale.
Even if that sounds stupid, you need to fill-in ALL metadata in order to use the In-App Product in development, even the screenshot for reviewers. Make sure you have at least one localization in place too.
The process is well explained by Apple, so I'll not enter into more details.
- Product IDs: Note down the exact Product IDs you create; you'll need them for
store.register(). - Cleared for Sale: Ensure products are marked "Cleared for Sale".
- Metadata: Fill in all required metadata, including pricing, localization, and review information (even a placeholder screenshot is often needed for testing).
6. Create Test Users
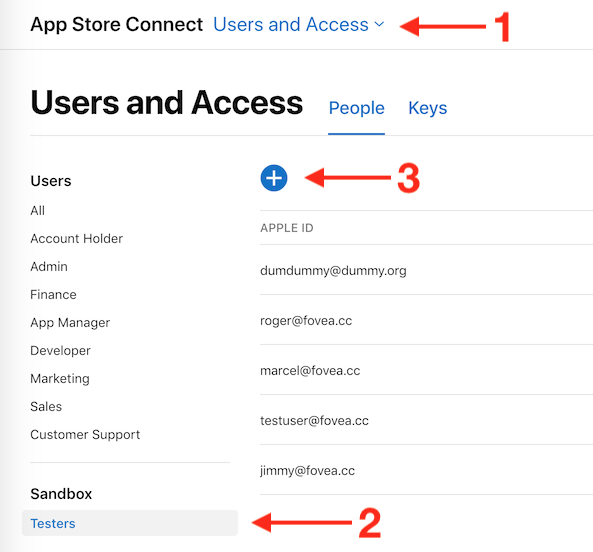
In order to test your In-App Purchases during development, you should create some test users.
You can do so from the AppStore Connect website, in the Users & Access section. There in the sidebar, you should see "Sandbox > Testers". If you don't, it means you don't have enough permissions to create sandbox testers, so ask your administrator.
From there, it's just a matter of hitting "+" and filling the form. While you're at it, create 2-3 test users: it will be handy for testing.
- Important: Use these accounts only when prompted by your app during a purchase flow on a test device/build. Do not sign into the main App Store settings with them.
7. (Recommended) Setup Receipt Validation Service
For subscriptions (and non-consumables), server-side receipt validation is essential for security and reliable status tracking. Do not rely solely on the device's local data.
Options:
- Use Iaptic (Recommended):
-
Iaptic is a service designed specifically for validating receipts from Cordova/Capacitor apps, handling complexities across platforms.
-
Sign up and get your API Key and App Name.
-
Configure the plugin using the
Iaptichelper class:const { store } = CdvPurchase;
const iaptic = new CdvPurchase.Iaptic({
appName: 'YOUR_IAPTIC_APP_NAME',
apiKey: 'YOUR_IAPTIC_API_KEY'
});
store.validator = iaptic.validator;
// For introductory/promotional offer eligibility:
store.initialize([{
platform: CdvPurchase.Platform.APPLE_APPSTORE,
options: {
discountEligibilityDeterminer: iaptic.appStoreDiscountEligibilityDeterminer,
// needAppReceipt: true // Required if using eligibility determiner
// Note: On iOS 15+ with StoreKit 2, introductory price eligibility
// is determined automatically via the native introPriceEligible property.
// The determiner is still needed for promotional offers on all iOS versions.
}
}]); -
You will also need the App-Specific Shared Secret from App Store Connect for Iaptic to validate iOS receipts. Enter this secret in your Iaptic application settings.
-
First, I assume you have an Apple developer account. If not time to register, because it's mandatory.
Let's now head to the AppStore Connect website. In order to start developing and testing In-App Purchases, you need all contracts in place as well as your financial information setup. Make sure there are no warning left there.
I'll not guide you through the whole procedure, just create setup your Apple application as usual.
Retrieve the Shared Secret
Since you are here, let's retrieve the Shared Secret. You can use an App-Specific one or a Master Shared Secret, at your convenience: both will work. Keep the value around, it'll be required, especially if you are implementing subscriptions.
- Build Your Own Server:
- Requires significant backend development.
- You'll need to call Apple's
verifyReceiptendpoint: Apple Verify Receipt Docs. - Handle sandbox vs. production endpoints.
- Store and manage subscription status, expiry dates, and renewal events.
- Implement secure communication between your app and your server.
- Set
store.validatorto your server's endpoint URL. - You will need the App-Specific Shared Secret for your server logic.
Choosing not to validate receipts server-side will lead to unreliable subscription status, inability to handle renewals/cancellations correctly, and significant security vulnerabilities.
- Remember: You'll need the App-Specific Shared Secret obtained in Step 3 for your validation server.
See also
- StoreKit 2 — The optional
cordova-plugin-purchase-storekit2extension enables Apple's StoreKit 2 API on iOS 15+, providing improved transaction handling and subscription management. See StoreKit 2 Setup for installation instructions. - Capacitor — If you are using Capacitor instead of Cordova, StoreKit 2 support is built in. See Capacitor Setup for platform-specific guidance.
After completing these steps, your Apple Developer account, App Store Connect record, and Xcode project should be configured to support In-App Purchases using cordova-plugin-purchase. You can now proceed to implement the purchase logic in your application code as shown here.